Three-key light switch wiring diagram
Application Feature
A person, without realizing it, uses a lot more light sources than he really needs. The level of lighting that he involuntarily uses can be half as much. If a person stops consuming excess electricity and turns off unnecessary light bulbs, this will save up to 30% of the electricity used. Just for these cases, the triple switch, shown in the photo below, is also used. A three-key device is connected, as a rule, to a chandelier to control any type of lighting: decorative, main and additional. Most often, the main lighting is used, and the remaining keys are applied as needed.
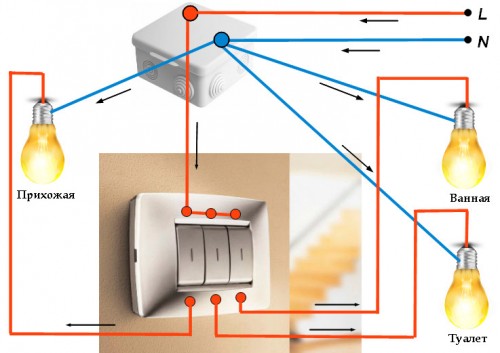
Also often connecting a three-key model is used to control the lighting of different rooms from one place. For example, in the corridor, you can install a triple model to turn on the light in the kitchen, bathroom and toilet, or instead of the kitchen in the corridor. It is very convenient and besides this idea allows you to save on wiring (instead of installing three separate products, only one will be involved).
Installation instructions
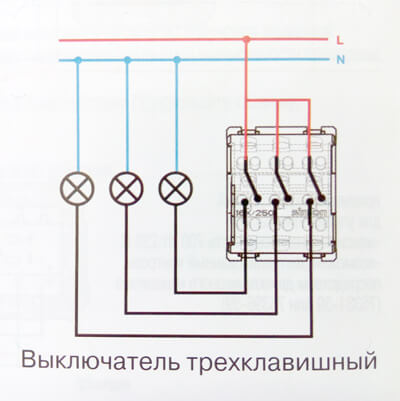
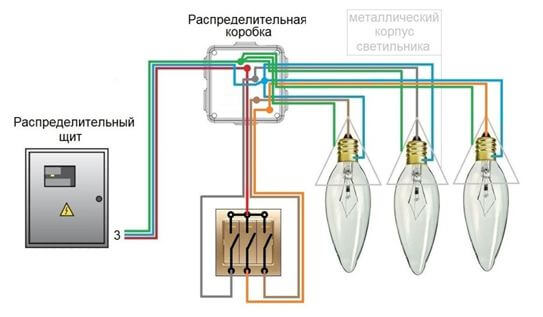
So, the wiring diagram for the three-key light switch is as follows:
Six wires come from the light bulbs to the junction box. Of these, three are interconnected and connected to the neutral conductor (this working zero comes from the shield, blue). Those three wires from the junction box that are left unused are connected to the outputs of the device. Then, from the junction box, you must connect the phase, which will be the same for the three light sources. Connection is made to the switch. If grounding is provided, the yellow-green wires from the fixtures also need to be interconnected. All connections are recommended using WAGO terminals.
This diagram clearly shows how you can connect a three-key type of switch and how, when a contact is closed, a certain lamp lights up:
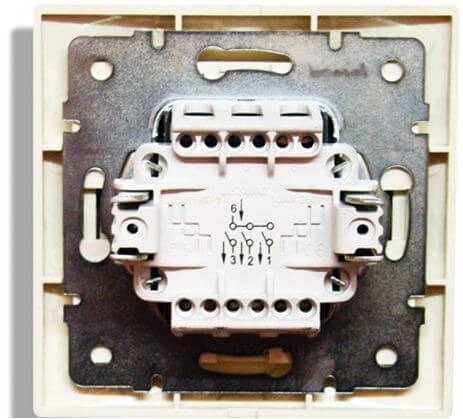
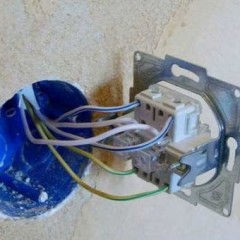
The three-key switch on the inside is as follows: on the case it is described in detail and shown where to connect each wire and where to take the phase. The back of the device looks like this:
The video instructions clearly show how to connect a triple light switch to the network:
A triple device can work according to this principle: connecting one lamp to the first key allows you to turn on the first light source, the second key is two lamps, and the third includes additional lighting, in the form of sconces. Such a connection makes it possible to combine lighting in a room of up to seven types and one three-key device can do this.
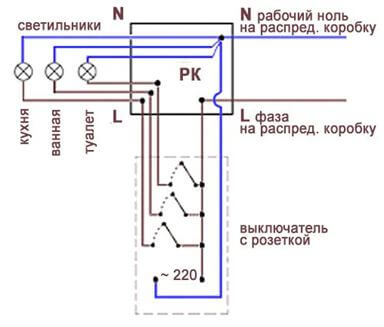
There is also a triple release, which is placed with a socket in one housing. Thanks to this design, you can save on wiring, as the work is concentrated in one place. The connection diagram for a three-gang switch with a socket in one housing is shown below:
This scheme has a slight difference from the previous one. The difference is that in this case, a neutral wire is added, which goes from the junction box to the outlet. This embodiment is used in places where the outlet is used infrequently, for example, in the bathroom.
The video example below provides step-by-step instructions for connecting a triple model with a socket:
That was all I wanted to tell you on this matter. We hope that the provided wiring diagram for the three-key light switch, as well as the installation instructions were useful for you and helped you to carry out the electrical installation yourself!
We also recommend reading:


