2 ways to connect a five-arm chandelier - which is better?
We have already reviewed the instructions for connecting the chandelier to the ceiling. The connection is quite simple if the product has one light bulb, from which there are 2 wires: phase and zero. But what to do if 10 wires immediately leave the lamp housing? In this case, many self-taught electricians have difficulties that can easily be overcome. To readersmy.electricianexp»Didn’t make mistakes and could independently connect a five-arm chandelier, below we will provide simple electrical wiring diagrams.
So, the chandelier has 10 wires emerging from the back cover (5 blue - zeros and 5 brown - phases).
All you need to do is connect the contacts to the home wiring (lead-in neutral and phase wires). This is done in a junction box, one of the selected wire connection methods.
To date, the connection of a five-arm chandelier is usually carried out according to one of two schemes:
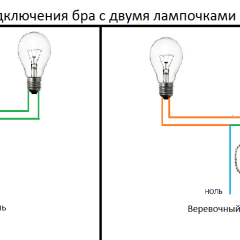
- By means of a multi-key switch (each key is responsible for a certain group of bulbs). In this case, it is better to use a two-key switch than a three-key switch (only 5 lights are on).

- Using the single-key switch (all lights turn on simultaneously)

We recommend that you give preference to the first scheme, as With a double switch, you can adjust the intensity of the lighting in the room.
I would also like to bring to your attention some useful tips regarding connecting a five-arm chandelier:
- A phase conductor must go to the gap. If you bring zero to the switch, then you may be shocked by replacing the light bulb.
- Fasten the cores with each other using the wagon terminal blocks. The products are simple and allow you to quickly connect 5 wires from the lamp with one lead wire.
- Be sure to turn off the power before starting work, otherwise you cannot avoid electric shock.
- If the wires do not have color marking, then determine where the input phase, and where zero is possible using an indicator screwdriver. Touch it to one of the contacts, if the light comes on, then this is a phase, no - zero.
- If the lamp housing is metal, be sure to connect the ground so that an accidental leakage does not become a threat to you.
We hope that these connection diagrams of the five-arm chandelier were understandable for you, and most importantly - useful.


Yes, questions arose ..
“Wago ... allow you to quickly connect 5 cores from a luminaire with a single lead conductor.”
A maximum of 5 sockets was seen in the wago 221 series (the one that is usually offered for connecting fixtures). For introductory lived there is not enough nest.
For example, now I need to connect a chandelier with 6 bulbs to a two-gang switch. In our multi-storey building from the ceiling, 3 aluminum wires are connected to the chandelier (2 phases and 1 zero). I imagined various options for a long time, but did not come up with anything compact. So, the option I see is this:
1. take a piece of unnecessary copper wire and cut it into 3 parts of a few centimeters.These three parts will be intermediate wires, 2 phases and one common zero.
2. connect the intermediate and aluminum wires with the help of WAGO 224 (it’s suitable for this purpose only, because it has a maximum of 2 outputs, it is too small for a home chandelier). We do this 3 times (because we have two phase and one zero wire).
3. insert into the WAGO 221 series (4 sockets) three phase wires from the lampholders and 1 of our intermediate wire
4. similarly, with the help of another WAGO series 221 (4 sockets) we connect the other three bulbs (cartridges) using the second intermediate wire to supply current (phase)
5. insert into the WAGO series 221 (5 sockets) 3 zero wires from the cartridges, 1 intermediate wire and 1 wire for branching (a kind of tee)
6. we insert the wire for branching into another WAGO series 221 (4 sockets) (performs the function of a “tee socket”), with the help of which 3 more neutral wires from three other cartridges are connected.
In total, to connect a chandelier with 6 bulbs, we need 3pcs. wago 221 4 sockets, 1 pc. wago 221 5 nests and 3pcs. wago 224 1 socket
In this way:
2 pcs. wago 221 4 sockets - connection of "phases"
1 PC. wago 221 5 nests and 1pc. wago 221 4 sockets - for connecting “zeros”
3 pcs. wago 224 1 socket - for "converting" an aluminum conductor into a copper one, so that you can later use the wago 221 terminals (or less compact wago 222).
Why did I choose wago?
I'm not going to twist. Instead, I planned to pressure the wires, but the further I connected them, I did not understand, because in fact, from collapsible joints, only the option with terminal blocks, and they are all screwed, are on sale, which is not very practical (I need to do and forget, but do not weld tightly or solder tightly). I was looking for clamping terminals instead of screw ones, until I found one, but Wago is in any store, albeit without paste for aluminum (I would very much like to see it in series 221).
I will be glad to advice, because until I make attempts to connect the chandelier to the network.