Tips for installing a wall outlet in a drywall
Step 1 - Preparatory work
First you need to prepare all the tools and materials for fixing the outlet in drywall. To install the product yourself, you must have:
- Drill with a special cutter (crown) to make a hole in the gypsum wall. The diameter of the crown should be 68 mm - the standard size of the socket for installation in plaster.

- Building level and hole marker.
- Indicator screwdriver for checking the mains voltage.
- A curly screwdriver in order to fasten a plastic cup, connect the wires and actually install the socket in the drywall.
We draw your attention to the fact that we will provide instructions for installing the product in drywall from the moment that the wiring in all rooms is divorced and at the same time all the walls are covered with gypsum board sheets. You can learn more about the main electrical work in the article - how to conduct wiring in the house!
Step 2 - Strobing Gypsum
So, we move closer to the main process. First, according to the wiring diagram, you must determine where you want to cut a hole for installing the outlet in a drywall partition. In the selected place, put a marker on the cross on the drywall, which will be the center of the future hole. If you decide install the outlet block in a plaster wall (several pieces at once), you need to make several round strobes in a row. By the way, the height of the sockets is not standardized by GOST or the rules of the PUE, so you can place the "electric point" anywhere you want. To do this, use the building level and one simple rule - the distance between the centers should be 72 mm, as shown in the photo below. Having made the marking, we can proceed to the gating of the GKL sheet.


There is nothing complicated here - set the core drill in the center of the cross and carefully drill the gypsum. All insert technology is examined in detail in a video example, which we recommend that you familiarize yourself with.
Step 3 - Attaching the Socket
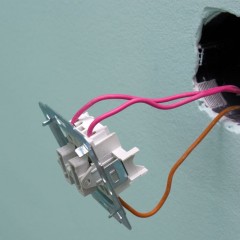
It is not at all difficult to properly fix the undersocket in drywall. As you can see, there are 4 screws on the case: 2 for attaching the box itself to the wall and 2 for installing the outlet. To get started, remove the wires for connection from the gate to the outside. After that, cut a hole in the bottom of the plastic cup for the input of the supply wires.Next, carefully install the socket in the drywall and use the two screws to fix the glass in the strobe. The presser feet on the opposite sides securely lock the product into the drywall.


It should be noted that the void between the load-bearing wall (brick) and the gypsum board sheet must be at least 45 mm (the height of the undergrowth). If in your case the gap is less, you will need to work a little punch - crush the notch in concrete or brick, so that the plastic box can be installed without problems. You should also know that you won’t be able to properly fix the socket in drywall without a socket, so immediately consider all possible obstacles and remove them before installing the plastic cup.
Step 4 - Connecting Wires
When you manage to securely install the socket in the wall, you can proceed to connecting the outlet in drywall. Connecting wires is not difficult even for a novice electrician. The main thing is to turn off the electricity on the input shield so that you will not be shocked during installation and connection. Before proceeding with electrical work - check the voltage on the wires in the socket using the indicator. If you do not know how to use an indicator screwdriver, we recommend that you read the relevant article.

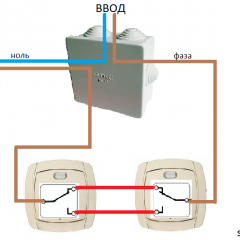
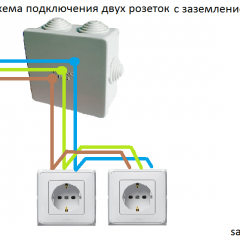
All you need to do is connect the zero (N, blue), ground (PE, yellow-green) and phase (L, usually brown) to the corresponding terminals on the socket body. Tighten the cores so that the contact does not loosen and the plastic does not begin to melt after installation and connection, as in this case may happen wiring short circuit and as a result - a fire in the house.


When you connect all the wires, you can insert the socket into the socket and secure it with screws. Mounting under drywall can be done either using the two remaining screws of the socket or install the housing by spreading the legs of the socket itself. After installation and connection, you just have to fix the plastic frame and the decorative cover, which is clearly not difficult.
That's the whole installation technology. As you can see, it’s not at all difficult to install an outlet in drywall with your own hands, the main thing is to take into account all the recommendations and be careful when installing electrical work. By the way, according to the same instructions, the light switch is installed and connected in a drywall, as well as a double outlet. If something was not clear to you, we advise you to watch video examples that detail how to mount the case, ditch the plaster and connect the wires!
Related materials:


the distance between the centers should be 72 mm, not cm. Correct.
Thanks, corrected!
Thank! Very clear and obvious!
Thank you for the instruction.
I didn’t understand what the boom in the drywall is attached to. for example, after a drywall, a heater then a wooden wall
To the drywall itself.
so will hang out. for plasterboard something can be? e.g. board or rail
Why will she hang out? If you buy a special socket for a gypsum board, install a socket (it is firmly fixed with presser legs), then the socket will not hang.