How to install a thermostat for a warm floor
Briefly about the temperature sensor
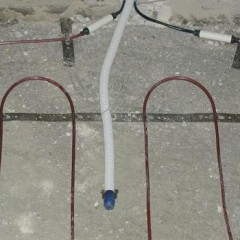
The set includes a temperature controller and a temperature sensor. Mounting a temperature sensor occurs using a plastic corrugated tube. The sensor in the corrugation is laid in the screed.

New sensors have a programming function. Thanks to this function, the owner can adjust the temperature controller so that during his absence the warm floor will work in an economic mode. At the same time, for a certain time before the owners arrive, the device goes into normal mode, thereby heating the room to the required temperature. Despite the fact that the cost of a programmable thermostat is more expensive than usual, it is better not to save on this, because in 2 seasons it pays off.
Choosing the location of the temperature controller
Before connecting the thermostat for underfloor heating, you should choose a suitable place for installation. If you choose the right place where the device should stand, this will not only contribute to ease of use, but the entire heating system can work correctly. Therefore, when choosing the installation location of the thermostat on the wall, it is important to consider the following points:
- Placement should be near the outlet.
- The most optimal height for placement on the wall is from 1-1.5 m.
- If the device is located near the door, then you need to install it as follows: when you open the door to the right, the device is mounted on the left, and vice versa.
- The sensor is not installed near window openings, the further the better.
Preparatory work
Before connecting the temperature controller, be sure to pay attention to the instructions that are attached to it. Particularly noteworthy is the point that specifically deals with the installation of the sensor, and the procedure for carrying out this work, because different manufacturers have different processes.
First you need to remove the front panel, carefully disassemble the control mechanism, on simple models it is in the form of a wheel. To remove it with a screwdriver, you need to pry the element, and then unscrew the screw that secures the front panel to the mechanism itself. Other models have special plastic latches that hold the front panel.To remove it, it is enough to press the latches with a screwdriver, and it will snap off.

However, if it is not possible to remove the panel, then it should not be removed by mechanical action. Indeed, in this way, you can easily break the latches, and to solve this problem you just have to buy a new regulator. To avoid this problem, you just need to carefully study the instructions and try to remove the panel again, but in the correct sequence.
The next step is the purchase of devices for installing a thermostat for underfloor heating. The first thing you need to have is a corrugated pipe. Usually it comes with a sensor, but if the manufacturer does not provide such a kit, then you need to buy it separately. The perfect corrugation diameter is 16mm. In order to determine the necessary length of the corrugation, it is necessary to determine at what height the temperature controller will be installed, and at what distance from the wall the temperature sensor will stand. Further, from the indicated height, use a tape measure to measure the length to the sensor that will be in the floor.
You will also need the following accessories:
- fixing screws;
- screwdriver;
- mounting box (socket box);
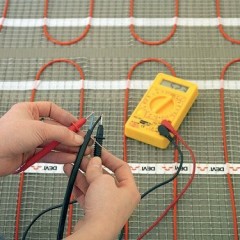
- indicator screwdriver, which can determine the presence of voltage in the network;
- level.
Connecting the thermostat to the mains
There are two ways to connect:
- Connect via an outlet using a plug.
- Carry a three-wire wire in a pre-prepared strobe from the thermostat to the outlet.
In order to connect the regulator in the second way, it is necessary to install it under the outlet. To do this, a hole is made under the usual socket. Using the crown, a hole is drilled into which the box is installed. There are also special boxes in drywall, in these boxes you can also install thermostats.

When connecting the temperature controller, you should pay attention to the contacts located at the back of the device, they are indicated by three letters that indicate different colors of the wire:
- L - phase, brown or red wire;
- N - zero, blue or cyan wire;
- PE - grounding, yellow-green or yellow wire.
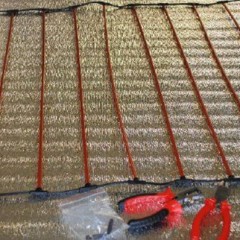
Typically, the cable comes with a temperature controller, wire length up to 3 meters. It is connected with a temperature controller and a temperature sensor.
For the whole circuit to work, a thermostat with a temperature sensor and a warm floor should be connected. Before connecting, make a strob from the temperature controller to the floor and lay the wires using the circuit that is in the instructions. About how to perform wall chipping, we told in a separate article.
So, you can connect the thermostat to the warm floor as follows:
- Connect the temperature sensor to terminal number 1 and 2 of the thermostat.
- The wire from the network must be connected to terminal numbers 5 and 6. The fifth phase is put, and the sixth zero.
- A heating cable is connected to terminal 3 and 4.

Note that the marking on the thermostat may be different and, accordingly, the connection diagram will be different (for example, the power cable will be connected to terminal 1 and 2).
It is also important to understand that not all houses have the ability to connect the regulator to a three-wire network, because many old houses are without grounding. There is also a single-core or two-core underfloor heating, this also affects the installation method.
Wiring diagram for a thermostat of a warm floor with grounding and without a grounding wire:


The installation of the temperature sensor is done under a tile or other floor covering, so it should be installed so that in case of a malfunction it can be removed without damaging the floor covering. Despite the simple wiring diagram for the thermostat, it is important to carefully read the instructions, because if the connection is incorrect, the warm floor will not work.
The video below clearly shows how to install the temperature controller and connect it to the network with your own hands:
Here, using this technology, thermostat for underfloor heating is installed in the bathroom and other rooms. Now you know at what height the installation is carried out and how to correctly connect the wires from the heating system and the temperature sensor to the controller.
It will be useful to read: