How to make grounding a triangle - step by step instructions
The advantage of a triangular contour
What advantage does a triangle have over a strip shape? It lies in the fact that such a design occupies a smaller area, respectively, earthwork will be much less. Yes, and to connect the pins is much easier in the pit than in a narrow and long trench. However, the most important advantage of triangular grounding is the reliable functioning of the protection, as if the jumper made of metal between the electrodes is damaged, the grounding device will still work (on the other hand).


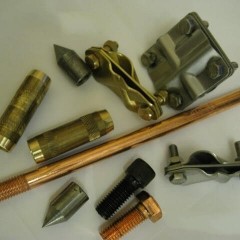
The height of each grounding electrode has certain standards and is 2 to 3 meters. The shape of the location of the electrodes in the ground is an isosceles triangle, the distance between which should be at least 1.2 m, the best length is the length of each ground electrode (i.e. 2-3 meters). In order to obtain a good contact connection, a metal plate is used, which is superimposed by welding. To bring grounding from the circuit to the house, it is recommended to use a bus made of the same metal or a steel wire of suitable section. The dimensions of the corner should be at least 50x50 mm.
Installation steps
You can make grounding a triangle according to the following step-by-step instructions:
- At the selected location, we mark the places of instillation of vertical electrodes. Then you need to dig a trench up to one meter deep. Depth should be below freezing of the earth. The construction lines should form a triangle, the length of the side of which is indicated in the calculations.
- Then you need to dig a trench from the structure to the power shield. The angle of the circuit to which the flap will be connected is the closest one. This is done to save materials.

- Next, it is necessary to hammer the electrodes into the ground, leaving 20 cm above the ground.

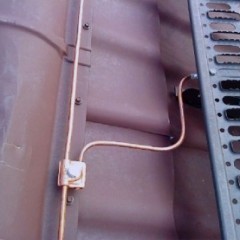
- Using a steel strip, you need to make a closed system. It is welded to the electrodes and forms a triangle.

- From the nearest point, a strip is laid to the power shield and displayed on the wall.

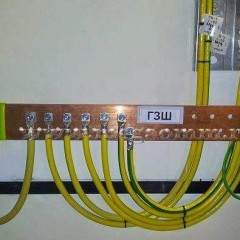
- To weld a bolt to the ledge to the cabinet, its thread should be outward.This means that the cap of the bolt will be welded. To connect the ground to the shield in the house, it is important to drill a hole for the ground cable in the wall in advance.
- Using a nut, the ground cable is connected to the bolt. After this, it is necessary to treat the places of welding and joints with special substances from corrosion and sealant.

The instructions in the pictures are as follows:

The final step in the installation of the ground electrode with your own hands will be ground resistance test. To do this, you need to have a special electric device called an ohmmeter. But since such a device is not cheap, it is better to invite a specialist from energy management. The specialist needs to take measurements and enter data into the passport of the ground electrode circuit.

It is important to check in dry weather, since atmospheric moisture can give measurement errors. The loop resistance rating should not exceed 4 ohms for a 220 volt network. If the resistance exceeds this indicator, then grounding needs to be improved. To do this, add another ground electrode or make a design in the form of a rhombus.
If the parameters meet all the norms and requirements and the low resistance of the circuit is confirmed, then you can bury the trench. This is done with a uniform soil, without rubble and debris. Grounding should not be connected to the shield not in parallel, but separately for each technical unit.
There is another way to test resistance without calling a specialist. To do this, it is enough to have a lamp whose power is not less than 100 watts. The light source is connected to the system with one contact, and the second to the phase. If the triangle is set correctly, the light will be bright. If it shines dimly, then the contacts between the ground electrodes are weak and the joints will need to be redone. If the light does not light at all, then the triangle is not installed correctly. In this case, you should check the circuit itself and see where the error was made.
The video below clearly shows how to assemble a grounding contour of a triangular shape:
That's all I wanted to tell you about how to make a grounding triangle with your own hands. We hope that the provided diagrams, photos and installation instructions were useful for you!
It will be useful to read: