How to make a do-it-yourself cotton switch
To increase their comfort and simplify everyday routine, people constantly come up with new appliances. Today we look at a device for remotely controlling a payload using pops. A homemade cotton switch is useful, for example, to turn on the light in the vestibule or pantry, where usually finding the right switch is a lot of inconvenience. For site readershttps://my.electricianexp.com/en we will tell you in detail how to make such a device with your own hands, what details for this you need to prepare, and according to what scheme to assemble.
Assembly diagrams
All cotton or acoustic machines are united by the presence in the microphone circuitry, which is needed to register sound. Also, the design provides an amplifier, trigger or time relay, to control the power switch.

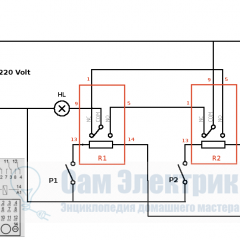
In this circuit, operating from a 220v network, the signal from the electret microphone is fed to transistor VT1 for amplification, then to the resistance matching unit and emitter follower on transistor VT2. And then to the comparator and trigger, assembled on a digital chip K561TM2.
The comparator is necessary to protect the circuit breaker from acoustic noise; it cuts off sounds that are too short or long. The signal that passed through the filter changes the state of the trigger (on or off), and that in turn through the power transistor, relay and thyristor controls the load. Any lamp, for example, an incandescent lamp, can act as it.
Here's a similar assembly diagram for assembling a homemade cotton switch - on an integrated timer.

For the convenience of studying the circuit, we identified the main nodes on it: a microphone amplifier on a KT3102 transistor, a comparator on a ne555 chip, a TM561 trigger and a KT3102 transistor that controls a power relay.
No less interesting is the self-assembly of the acoustic relay on the Arduino microcontroller and ready-made modules for it, which will greatly simplify the understanding of the principles of work for beginners and allow you to fine-tune some of the work parameters.

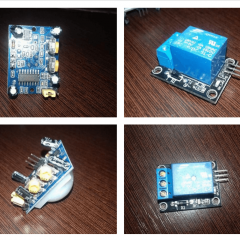
To make a cotton machine with your own hands, you need to prepare three boards:
- Arduino Nano;
- sound module;
- power relay module (note that it is 5 volts).
You also need a computer to download the firmware, a USB cable, a 5 Volt power supply (any charge for the phone is suitable). On the PC, you need to install the Arduino IDE program, for microcontroller firmware. You can download it for free from the official website of the board developer.

After copying the text of the sketch (program) and pasting it into the Arduino IDE window, you can immediately flash the controller. By changing some parameters and rewriting the device, you can fine-tune a home-made sound relay for yourself for stable operation. As you can see from the diagram, four wires are connected to the controller: two for power. The yellow wire connected to pin 13 is for controlling a power relay.The control wire from the microphone module connected to the analog input A0 of the controller is green.
The microcircuit contains 8 analog inputs and 14 digital input / output contacts. For our project, we took A0 and D13, since the LED on the Arduino board lights up with it, and you can clearly see when a signal is sent to the relay module.
Arduino sketch for making an audio relay: Sketch
Changing the value of x in the line if (analogRead (Al)> x), we set the sensitivity threshold, the maximum value of which is 1024. By making changes to the delay line, the delay interval after the sketch is changed. This sets the switchover ready time. In addition, the protective threshold against interference and false alarms is adjustable. In addition, the microphone sensitivity can be adjusted with a variable resistor on the board using a small screwdriver.

To test and configure the circuit, we took the Arduino UNO board, based on the base of the ATmega238 microcontroller. At the same time, any other models are suitable, since we do not use many pins on the board, and the sketch does not require high performance.
The video below clearly shows the homemade cotton switch, which we assembled according to the provided scheme:
Video instructions
A few simple ideas that allow you to independently make an acoustic light switch are provided in the video:
Now you know how to make a cotton switch with your own hands. We hope that the assembly options provided, the simplest schemes and video tutorials were useful and interesting for you!
Also read: