How to make a soldering station at home
Not only beginner hams, but also experienced craftsmen experience certain difficulties when soldering electronic components with inexpensive soldering irons without thermoregulation. After all, one can encounter such a phenomenon as overheating of the sting of the device, which leads to oxidation of the solder, the formation of carbon deposits on copper, and as a result of poor thermal contact with tin on the board and the leg of the element, or to excessive heating of the board and delamination of the tracks on it. In this article we will look at how to make a soldering station with your own hands, providing all the necessary assembly schemes, photos and video materials.
Step 1 - Making a Contact Soldering Iron
This option can be called the simplest and fairly budget. This design regulates the voltage on the soldering iron, respectively changing the temperature of the tip. But with this method of adjustment, there is no feedback from the sting, that is, we can judge its temperature only by external indicators. However, this significantly improves the quality of soldering. If you plan to connect large parts, then the power supplied to the soldering iron can be increased, if smaller, then reduced, which is very convenient.
As a voltage regulator, we recommend using dimmer for lighting (dimmer switch). The only drawback of this idea of a homemade soldering station is that the temperature range is too large. After all, the power in the dimmer is regulated from almost 0 to the maximum, while we do not need to reduce the power by more than 2 times. But you can redo the circuit, add a “fine tuning” resistor in addition to the main one.
Assembly scheme soldering station at home:

The rectifier bridge is used in this circuit, which will allow us to raise the voltage from standard 220 volts at the input to 310 volts at the output of our homemade soldering station. This will be relevant for those home masters who have electrical the voltage in the house is low, because of which the soldering iron does not heat up to operating temperature. In the absence of a dimmer, you can assemble it yourself, how to do it, and what for this we need, we considered in our article about homemade dimmer.
Step 2 - Putting the Air Soldering Iron
Sometimes when soldering, it becomes necessary to replace SMD elements and the soldering iron with a sting is too large and inconvenient for this. For these purposes, a special air dryer is used. The principle of its operation is similar to a home hair dryer - the air stream is forcedly blown through the heated element and transferred to the soldering place, heating the solder non-contact, evenly, and not at one point, but in a certain area.
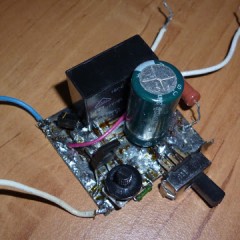
An air soldering iron can be made out of ordinary by inserting a suitable antenna tube instead of the tip. Next, you must close all openings provided for cooling. For example, using heat-resistant paper and a coil of copper wire, as shown in the picture.

Forced air is supplied by an aquarium compressor, using a dropper tube through the part where the power cord is connected.
To adjust the temperature of the air flow, you can use the dimmer from the previous method. In addition, it is recommended to rewind the soldering iron to a lower voltage of about 8-15 volts, this will significantly increase the safety of the device due to the absence of life-threatening 220 volts. As a heater, a nichrome wire with a diameter of 0.8 mm from an electric stove spiral can serve. It must be wound carefully, without overlaps and short circuits, on the frame. You need to pay attention that you also need a step-down power supply, the power of which should be at least 150 watts. As it can be used a suitable mains transformer.

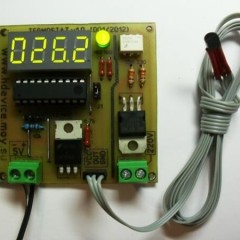
A more expensive method of regulating the temperature at the hot end of a soldering iron is to maintain the degrees set on it. For this, a thermocouple is additionally installed near the sting, in one of our articles we told how to make a thermostat yourself.
Combining our homemade products, you can make a universal soldering station that will keep the temperature set, which is very convenient and corresponds to the functionality of expensive purchase models.
Another option is to make a non-contact infrared soldering station of a ceramic cartridge for a lamp and a nichrome spiral connected to a step-down transformer and a dimmer for convenient adjustment. You can also apply a thermostat.

How to work with an infrared soldering station can be seen in the video below, there you can also find out about the nuances of working with it:
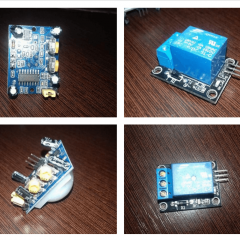
Homemade review on Arduino
And finally, we recommend that you familiarize yourself with more complex assembly schemes for a homemade soldering station based on the Arduino platform:
We hope that you liked the above methods. It remains only to choose the most suitable option and bring it to life.
We also recommend reading: