How to repair a boiler yourself?
Reasons for Failure
The main cause of boiler failure is poor water quality. Because of this, scale forms on the surface of the heating element, the inner walls of the tank lend themselves to corrosion, which in the future entails more serious consequences and costly repairs in the service center. In addition, the water heater may stop working due to improper connection to the mains and hot / cold water circuits.
As for the latter, with connecting a boiler it is imperative to install a safety valve between the pipe outlet of the tank and the cold water pipe that protects the tank from rupture during water hammer. You should also make the connection according to the instructions and, no less important, do not mix up where something is connected. Sometimes situations arise that, if improperly installed, the water heater does not collect water. Note that panic in this case is not worth it. It’s better to look again at how to properly connect the equipment to the pipes and, most likely, you will understand why your water is not accumulating.
In order for you to understand how to repair a storage water heater in different conditions, then we will separately consider how to repair all possible breakdowns with your own hands.
Remove scale
If the boiler does not heat the water to the desired temperature, but still makes noise when turned on, it means that scale has formed on the heater and needs to be cleaned. It is not difficult to do this, you just need to disconnect the equipment from the network, drain the water from the tank and disassemble the housing to remove the heating element. With the disconnection of the plug from the outlet, you will not have any difficulties, but draining the water can make repair a little difficult. Immediately recommend watching a video lesson that shows a simple method to solve this problem:
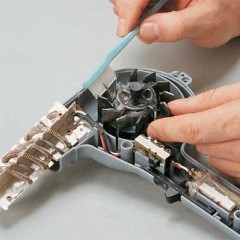
After you empty the tank, it will be necessary to disassemble the boiler with your own hands. To do this, carefully disconnect all the fastons connected to the thermostat and unscrew the bolts, which are usually 6 pieces.


During the extraction of the heater, some more water will remain that remains in the tank. It is recommended that the heating element itself be cleaned immediately while it is wet and the scale deposits have not hardened.For cleaning, we recommend using special products that can be sprayed onto the heater. After some time, deposits are cleaned off effortlessly with a wooden spatula or even a blunt knife. Also, for repairs, you can boil the heater in a bucket with the addition of special acid in water, which will effectively solve the problem. In order to surely get rid of the scum, we recommend fine-grained sandpaper (“sandpaper”) to clean the tubes to a metallic color.
At the same time as repairing the boiler, which heats water for a long time or slightly, it is recommended to replace the magnesium anode, which protects the tank from corrosion. To do this, dismantle the worn rod and purchase exactly the same to do the replacement yourself!
After that, you need to assemble the boiler in the reverse order and check whether it was possible to repair the weak heating of the water. Do not forget that the first thing you should do is to fill the tank completely with water, after which plug the plug into the mains and start it.
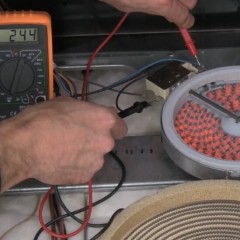
We draw your attention to the fact that there is a situation when the boiler does not heat water, because the heater is broken. In this case, an independent repair consists in the fact that you need to ring it with a multimeter, setting the resistance measurement mode. This is what we will tell below!
Check the circuit with a tester
If the light on the boiler burns and the water does not heat up, then it is likely that the heater, which we mentioned above, does not work. Check it at home is quite simple, you need to install the tester's probes on the contacts of the heater and see the resistance on the board. With a working heater, the resistance can vary between 0.4-0.7, as shown in the photo below. If on the scoreboard you see “1”, then a break has occurred and you need to replace the part with a new one, because repairing it is almost impossible.

By the way, if the boiler is shocking or when it is turned on RCD disconnects in itself, the cause of the breakdown, again, is in the heater from which the leak occurs. You can check the malfunction by connecting one probe to the contact of the heater, and the second to the tube itself. You will see “1” on the display, the part is serviceable and there is no need for repair, minus value or too large - replacement is required. More about how to check the heater with a multimeter, we told in a separate article.
Another reason why the boiler does not heat water or, on the contrary, is very hot, is the failure of the thermostat. You can check it in two ways - a tester or a lighter. Everything is clear with the tester, you need to follow a similar procedure, but as for the lighter, everything is more interesting. To start, dismantle the thermostat and press the button on it (it is circled in the photo below). After that, the copper contact of the thermostat must be heated. If after some time the button returns to its original position (it knocks it out), the thermostat is working. If the thermostat does not work, it is possible to repair the boiler, which does not turn off or does not turn on, by replacing this part with a new one. I would also like to note that there is no need to drain the water to replace the thermostat on the water heater. It is enough to disconnect the equipment from the network and disconnect all the wires.

Also, sometimes a breakdown occurs - the temperature does not appear on the display of the water heater or the display does not work at all. In this case, check all the elements of the circuit and if you do not find an open, most likely the control unit has broken. You will not be able to repair the electronics with your own hands in the absence of experience and knowledge, so you will have to take the electric water heater for repair to a service center.
We get rid of leaks
If you notice that water is dripping from the boiler, it is not always possible to repair it yourself. It is good if the cause of the leak is the wear of the seal on the flange.In this case, the gasket must be replaced with the same size, which will fix the breakdown. Things are much worse if the water heater leaks due to wear on the tank itself. Some advise to glue or seal the holes, but, as practice shows, after a short period of time, you still have to say goodbye to the boiler, as such leak repair methods are not very durable.
That's all I wanted to tell you about do-it-yourself boiler repair. We hope that now you know what to do if an electric water heater is leaking, it does not heat well or does not work at all. These devices do not have so many problems and you can get rid of them by timely system maintenance. At least once a year, check the check valve and clean the heating element so that malfunctions bypass you!
It will be interesting to read:


The boiler tank was dripping. When I opened it, it found rust in one place (the tank was clean without raids) and I decided to repair it myself. In the found place I cut out the opening of the outer tank, where I rotted.
Well cleaned, degreased and soldered 0.5 kW with a soldering iron. As long as it does not flow
In order not to guess how many ohms the ohmmeter of the multimeter should show when checking the integrity of the heater coil, it is necessary to divide the square of the voltage by the power indicated on the heater. The error is +/- 10%.
For an approximate assessment (not measurement! —The MegaOmmeter is needed) of the insulation strength between the NE and the body of the dried (!) Heater, the limit of the multimeter must be set to at least “2.000 kOhm”. The measurement should show “1”.
Fistulas in the tube of the heating element even cannot be welded with argon welding - without applying a patch ...
Recently, has water changed in the shower, then hot, then cold? someone faced a similar problem, what is the reason and how to fix it?
Well, it’s unlikely that TEN is involved - it either works or not. See the plumbing part - the mixer first