How to connect a chandelier on the control panel?
Installation steps
The installation of the lamp on the remote control is no different from the usual installation of a ceiling lamp. Before buying, be sure to check the complete set of the product, as well as the availability of instructions with step-by-step installation. Also check that the lampholders are working properly by visual inspection. Ask the seller to check the serviceability of the control panel and even assemble a lamp for inspection.
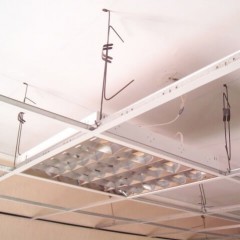
Before installing the chandelier with the control panel, we find in the kit a perforated strip and long bolts with nuts, we will fasten it to the ceiling, as shown in the photo below:

Next, you need to carefully inspect the place before drilling and outline the points for drilling in the ceiling plate, so as not to damage the wiring. If you have a plasterboard ceiling, then Molly bolts are used to secure the plank. About, how not to get into the wiring when drilling, we told in the corresponding article.
If you want to learn more about the nuances DIY chandelier installation, we recommend that you click on the link provided, where we examined not only the main mounting methods, but also the technology of mounting the lamp on a suspended ceiling!
Connection Rules
After mounting the strip, de-energize the line by turning off the machine in the shield. Now you can do the connection of wires coming out of the ceiling. First you need to carefully straighten them and level them in size. Then do not overdo it, strip them from the end by one and a half centimeters. If the wires are the same color, you need to find the phase. In the event that the three conductors exit and you previously had a two-key switch, one of the phases will have to be insulated, and the switch replaced with a one-key. How to find the phase can be found in our article. We spread the wires to the sides, turn on the machine and look for the phase. We mark phase conductors with a marker or felt-tip pen, and then turn off the machine again.
On the upper chandelier bowl there is a control unit and a plastic terminal for connecting the cores. Three colors of wire are usually suitable for the terminal: blue or black (N), brown or red (L), yellow-green (PE). Lead wires must be connected to terminals (L) phase and (N) zero. The terminal (PE) is not used in old houses.

As a rule, the controller is already divorced into lamps, which are grouped together.The controllers have a sticker with a wiring diagram, and if desired, you can switch the groups in the lamp as you wish. The connection diagram of the chandelier with a control panel is presented below:

It is advisable to install the lamp in the presence of an assistant who will hold it while you are connecting to the terminals. In the absence of such an assistant, it is possible with the help of a hook made of wire or rope to temporarily suspend the chandelier while mounting the wires in the terminal block.
The final step will be the final collection of all elements, installation of lampshade and lamps. Particular attention should be paid to the contact of the lamp with the base, that is, you need to twist with feeling, ensuring good contact. Now you can turn on the machine and apply power to the lighting line, and then try to control the lighting from the remote control.
Important! The chandelier only works if the switch is in the on position and voltage is applied to it. Only then can you control the remote.
Finally, we recommend watching a video that clearly demonstrates the correct connection of the chandelier with a control panel:
So we talked about how to independently install and connect the chandelier on the remote control with your own hands. As you can see, there is nothing complicated, the main thing is to act according to the instructions provided.
Surely you do not know: