Instructions for replacing the heater in the washing machine
Step 1 - Determine the location of the heater
The first step is to determine which side is the heater in the washing machine. To do this is quite simple - you need to move the case away from the wall, turn it around and examine the back wall. If the lid is large, so to speak the entire size, then most likely the heater is located on the back side, under the tank. In this case, the replacement technology of the heating element will be greatly simplified, because to access it, you just need to unscrew the back cover of the washing machine.
If the cover is small, then it is intended only for access to the washing belt, and the heating element itself is located in front, also from below (as shown in the photo below). In this case, to replace the part, you will have to disassemble the front panel for repair, which is much more complicated and longer in time.

One way or another, I recommend that you first remove the back cover anyway and see if there is a heater under the tank. In any case, the removal process does not take much time.
Important! As a rule, such washing machine manufacturerslike Candy, Whirpool, Indesit, Ariston, Electrolux, Zanussi and Atlas, the heater is at the back. LG, Bosch and Samsung often have a heater located on the front side. In washing machines with vertical loading, it is possible to replace the heater through the lower part of the front panel or the side wall, which can be removed without difficulty. However, the location does not always meet the specified standards. Model models are different, as they say.
Step 2 - Provide Access to Fasteners
When you determine where the heater is located in the washing machine, you can proceed to disassemble the housing. To do this, first of all, you need to disconnect the equipment from the mains, in order to prevent electric shock when replacing the heating element. If the location is rear, you will have to additionally disconnect the drain pipe and water supply. Also, you can not do without draining the remaining water from the washer. You can drain the water through a special drain filter or if you lower the drain hose below the level of the machine body, which can be a more problematic solution.
Next, remove the back cover. If the heater is behind it, everything is fine, it remains to be removed and replaced, as we will discuss below.If you need to remove the front cover, follow the instructions below:
- Remove the cover that is on top.
- Remove the detergent tray. As a rule, it is fastened with self-tapping screws and is additionally fixed with a latch, which must be carefully disconnected.
- Remove the steel hoop from the seal on the hatch. It is held by a spring, which just needs to be stretched a little. After removing the hoop, carefully remove the seal itself, as well as the door lock, from which it is necessary to disconnect the wires.
- After that, you can unscrew the front panel, which is fixed with screws and, possibly, clips.
- Access to replace the heating element is provided, you can proceed to the main process.
Step 3 - Change the heater
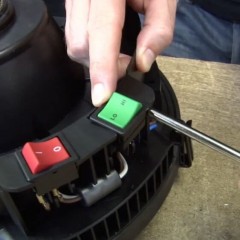
So, all that remains is to independently replace the heater in the washing machine. This is not difficult, because the heater holds only one nut. Before loosening this nut (1), disconnect the power, ground, and wires from the temperature sensor.

In order not to confuse anything after the replacement, we recommend that you initially take a picture of how everything is connected.

It is best to use a socket wrench to loosen the nut that holds the heating element. If this is not the case, a carob will do. Unscrew the nut almost to the end, then press the pin (2) inward, which will allow you to remove the part from the seat. Then we unscrew the nut completely and, loosening the heater to the sides, we get it out gently.

Before starting to replace the heating element of the washing machine, we recommend checking it again. The verification methodology is provided in the video below:
If the heater really fails, it must be replaced with a new one. About how to change the heater TEN of a washing machine at home, the master tells in a video tutorial:
The assembly is carried out in the reverse order, but before that you need to clean the compartment to accommodate the heater from powder and excess debris. To prevent leakage, you can additionally put a new heater on the sealant. But if the dismantling of the old product was carried out carefully and the seat jack is not damaged, there will be no leaks. We connect the wires, fasten the back cover and check whether the water is heated when the wash is turned on.
That, in fact, is the entire technology for replacing a failed heating element. As you can see, you can replace the heating elements of the washing machine with your own hands and it can be done quite simply!
Surely you do not know: