Instructions for connecting a ground outlet
Installation instructions
So, so that you can see the difference between the European and Soviet versions of the case, we provide these photos:

Soviet standard of the case

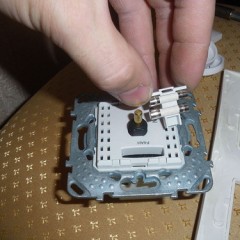
Modern standard
As you can see, the euro outlet has copper terminals on its sides, which are grounding. The advantage of this embodiment is that when the cord is connected to the appliance, the protective earth starts working before the voltage from the 220 volt network is applied. Even if the equipment is faulty and voltage breaks through the metal cladding, you will be protected from electric shock.
To independently connect the euro outlet to the mains, you must perform the following steps:
- Turn off the power at the input shield. It is strictly forbidden to make a live connection!

- According to the wiring diagram, put the markings on the wall in the place where the euro outlet will be placed. It should be noted that the height of installation of outlets is not standardized by the rules of PUE and GOST, therefore you can choose the most suitable distance from the floor for your conditions. Usually, in order to connect a backup euro outlet, a height of at least 30 cm from the floor is taken.

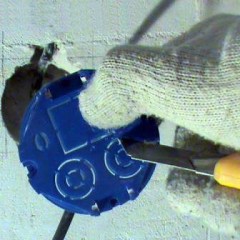
- Drill a wall for mounting the cabinet (if you want to install it inside the wall). If you need to connect an euro consignment note, this step is not necessary. How to do it right wall shredding for wiringcan read in the corresponding article.

- Install the socket and put it in the wall (again, if the housing is for flush mounting). If you decide to conduct electrical wiring in an open way in a wooden house, an insulating piece of asbestos will need to be placed between the outlet and the wall.

- Connect the wires to the appropriate terminals. We draw your attention to the fact that the euro outlet must be connected with grounding. As a rule, the phase is connected to the right, zero to the left, and the "ground" in the center. We recommend that you familiarize yourself with the connection diagram in order to do everything right in the future:


- Fasten the housing to the gate. To do this, insert the outlet into the socket and spread the presser legs on the sides (using screws). If the euro socket is a consignment note, it is enough to simply fix it to the wall with self-tapping screws.

- Install the plastic cover.The decorative panel is installed using the central screw between the sockets for connecting the electric plug.
In this way, you can connect the Euro-outlet with grounding yourself and install it in a wall of concrete, brick or gypsum. If you have wiring without grounding or have questions about the connection, you may find the answer below.
Non-standard situations
So, there are several situations in which there are difficulties with connecting the euro outlet. Now we will consider two of the most relevant today.
- No grounding wiring. If you live in the old Khrushchev, in which the protective conductor PE is not provided, you can connect the Euro socket in two ways. The first is just to insulate the yellow-green wire and not plug it into a power outlet. In this case, you simply will not have grounding in the apartment and the chance of electric shock, of course, will increase. The second is to do grounding. But this option of protection is extremely dangerous and even prohibited by the rules of the PUE. We still recommend stopping at the first option, only additionally install an RCD in the apartment.

- It is necessary to install the euro outlet in the place of the Soviet. In this case, the installation is easier because You will already have a strobe ready (if the placement of the old outlet suits you). All you need is to dismantle the old socket and insert a new one, and then fix the European model of the outlet.
On this, the instructions for installing and connecting a euro outlet do it yourself. In the video example that we provided, all the stages of installation are considered in more detail, so be sure to read this instruction!
Also read:


In fact, the Euro socket - this is the Soviet outlet (without grounding). And what you (and many others) mistakenly call a Euro outlet is a Shuko outlet.