Oscilloscope User Manual
Briefly about management
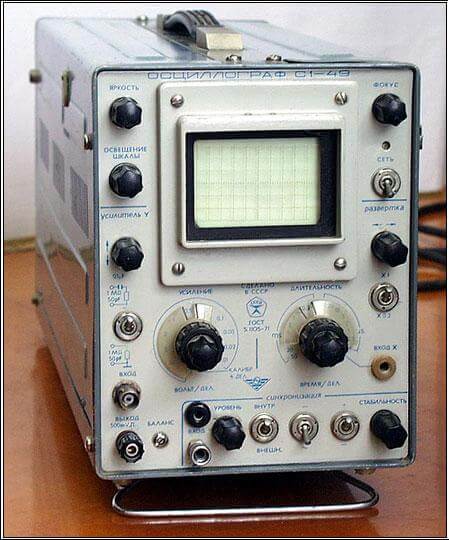
Model c1-49 looks like in the photo:
The switch on the device, located on the right side with the inscription "Network", After turning the toggle switch to the on position, the red light indicator above it should light up.
Handle "Focus»Changes the thickness of the beam - since the device is not equipped with a temperature compensation unit, and the diameter changes during the heating of the oscilloscope.
Regulator with the inscription "Brightness»Adjusts the brightness of the point on the screen, you can individually adjust to the working environment.
«Scale lighting", Again, an individual approach to the illumination of the measuring grid, in bright daylight, you will have to make it brighter to view the grid.
Pen with the inscription "Gain Y", Inherently coarse adjustment of the vertical gain of the beam. When measuring high-level signals, you will have to reduce the sensitivity level so that it fits in the oscilloscope screen. When searching for weak signals, you need to increase the sensitivity of the amplifier.
Below is a toggle switch with which you connect to the input of the measuring capacitance. This is done to cut off the direct current from the measurement. The amplifier gets only the variable component of the signal.
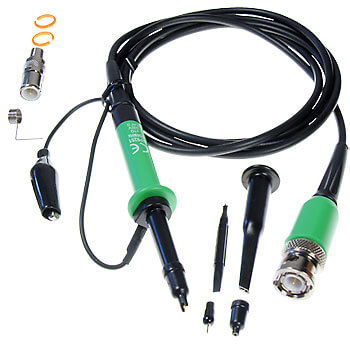
Underneath is a bayonet measuring input connector, under a special adapter. The device is equipped with special probes for making measurements, shielded wires, with a voltage divider. The probe for measurements does not introduce distortion into the test signal, and the impact on the device under test is minimized. Usually with the oscilloscope comes several types of probes, for different types of measurements.Active probe - with its own amplifier. Passive without any additional elements, except for the matching chain, to reduce the effect of cable length on the input signal. And probes with a divider, in which a separate toggle switch has the ability to reduce the voltage amplitude of 1:10; 1: 100; 1: 1000.
Below the mount is the output from the built-in square-wave pulse generator. With it, you can check the device of interest, as well as perform a start calibration of the meter.
Under the oscilloscope screen, there are regulators with a scale:
- Switch "Gain»Selectable voltage range - volt / division. It is selected how many volts fit in the division of the measuring grid of the screen, and visually you can determine the voltage value, knowing the range on the switch.
- The second switch with a scale measures the pulse duration. Simply put, the measurement frequency.The duration of the signal per division of the measuring grid.
- Regulator " Scan»Shifts the beginning of the pulse horizontally. It must be used to shift the signal under study on the scale, in the case when the beginning of the pulse is obtained outside the scale.
- Input "X”Allows the use of external generators to control horizontal scanning. In the case when the built-in is not enough, or is not stable, that is, the frequency floats. In this position, you can observe the Lissajous figures. Complex geometric patterns.
Below are the sync control knobs:
- Tumbler switchInternal External»A choice is made from which source the scan will be synchronized. Simultaneously with the studied signal or from the internal one.
- Regulator "Level»Changes the sensitivity, it depends on which edge of the signal will trigger the sweep, the rising or falling edge of the external signal.
- The toggle switch “- / ~” switches the mode of single or self-oscillating sweep start.This mode is convenient for studying digital logic devices, where the signals do not follow periodically, as in generators.
- Adjustment knob "Stability»Same as synchronization. Using this resistor, the synchronization of the signal with the sweep is adjusted. The sinusoid of the beam stops running on the screen and freezes with a static picture, which can now be studied in more detail.
User manual
The oscilloscope needs calibration before starting work. After connecting to the network, it is necessary that the device warms up and stabilizes. This usually takes 5 minutes. Regulatorsamplifier Y"And"Scan»Sets the beam in the center of the screen. After that, brightness and focus are adjusted.
If the measuring probe touches the output of the generator, then we will observe rectangular pulses with a frequency of 1 kHz and 500 mV on the screen. With the position of the regulator "Duration"In position 1ms (millisecond). If everything is in order, then our device is ready for use.
When measuring a signal, the “Gain"And"Duration"Set to the extreme left positions. By amplification, they raise the measurement range to explicit, most distinguishable signals on the screen, and with the “Duration»It turns out what is the frequency of the input signal.
For reference, 1 kHz (1000 Hz) is 1 ms, 1 Hz is 1000 ms.
When the signal is fixed on the screen, using the measuring grid, the signal voltage, period (frequency) is measured. Modern digital meters measure this information directly on the display of the device, and the operator knows everything about the signal: voltage, duration, duty cycle, period. This concludes our brief explanation. We hope you now know how to use the oscilloscope and why this measuring device is needed. Finally, we recommend that you watch the video instructions below, which show how to work with the most popular oscilloscope models.
It will be interesting to read:



S1-49 by the standards of the 80s was already "with a beard", and now most digital cameras. Would make them educational program