What are the tips of NShVI and NShVI-2 for?
Tip design
The tip consists of two parts:
- A conductive tube that is made of tinned electrolytic copper.
- Insulated polyamide flange.
For their manufacture, special copper is used. It is this connection that allows the clamp to not damage the conductor itself in the places of screw fastening. NShVI are made with a section from 0.25 to 150 mm. The material from which they are made is subjected to galvanic tinning.
The sizes of NShVI and NShVI-2, as well as their color marking are provided in the tables:


Tips of NShVI come in two types: single and double. The advantage of the double design is the ability to crimp two stranded wires. For example, they can be used instead of a jumper wire as a power supply to the circuit breaker. Such lugs are used for two wires included in one socket of an electrical appliance.

The difference between single and double tips is in the form of a plastic flange. One wire is designed for single, and two for double, so they have a more expanded flange.

The video below clearly shows what the lugs for wires are and how to use them correctly:
Scope and rules of crimping
The use of NShVI allows you to protect the conductor from overheating due to damage to the contact, from pinching or fracture of the current-carrying conductor with a strong tightening of the screw contact. They protect the cable cores from damage, due to the fact that the screw clamp is in contact with the ferrule and not with the cable itself. In this case, the strength of the contact will not suffer, but rather strengthen. The photo clearly shows what the wire crimped by the tip looks like:


There are different sizes of sleeves, based on the cross section of the conductor. For convenient use, the manufacturer marked them in different colors, which you already noticed. Virtually every manufacturer has a different color coding, and low-cost manufacturers may not have this color coding.
The crimping process is not laborious and simple, however, it is necessary to approach responsibly to the preparatory work. Before crimping the wire, it must be carefully cleaned with an insulation stripper, stripper or special knife. For example, a stripper or stripper speeds up the stripping process, and they are also very convenient to use.
Errors when crimping the conductors with lugs, as well as the correct installation of the NShVI, are clearly shown in the photo:

Regarding the use of a special tool, an electrician can determine for himself whether he needs it or not. Such stripping is carried out exactly along the length of the sleeve into which the cable will be inserted.
The next step is to put on the sleeve on the insulated part of the cable, but before that, you must correctly select the required diameter of the NShVI. For crimping use press tongs or crimping tongs.
It is important to know how to use the press tongs, otherwise the cable will not be fixed securely. Therefore, at the beginning, you should insert the stripped end of the wire into the sleeve, then a formed tip is placed in the groove of the press tongs, and its insulating part should be located right next to the tongs body. Then you should hold the handle of the press tongs, then you can connect the finished connection to the electrical equipment. The photo below clearly shows how the crimping should be performed:

As a result of combining the wires, where NShVI is used, a reliable, high-quality connection will be obtained, because thanks to these caps a monolithic structure is obtained.
It is also important to know what the NShVI-2 tip is used for. Its main purpose is to connect two different wires, which are subsequently connected to one socket of electrical equipment. The principle of crimping a double cap is absolutely no different from crimping a single NShVI. It is important to remember that the cap must be sized for the cable. So that the conductor exactly matches the diameter of the sleeve. This rule applies to both types of NSHVI.
The cross section of the core is indicated by the first numbers on the tip, and the following numbers, which are written through a hyphen, indicate the length of the working part of the wire cap; measurements are in millimeters. The main colors used for the caps are red (0.5-1.5mm), blue (1.5-2.5mm), and yellow (4.0-6.0mm).
The video below clearly shows how to compress the wire with a double tip of the NShVI:
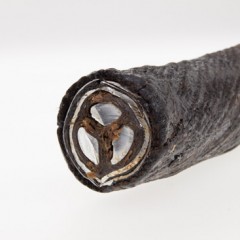
It is also important to talk about the use of NShVI to connect electrical appliances. Today, the most popular wire that is used to connect sockets and switches, as well as for wiring and installing automatic machines in an electrical panel, is certainly a copper multi-core cable. Nevertheless, it is not suitable for screw connections, which are inherent in most types of sockets and switches, as well as automatic machines. Because of this, the cable, which is connected in a socket or in a circuit breaker, is displaced by a screw, as a result of this, the cores are moved apart on the mounting socket and are damaged by the clamping screw. That is why the wire loses the reliability of the connection, as well as the quality of the contact.
Initially, to solve this problem, they used the soldering of the ends of the wire, in this way all the cores were combined and became one. However, such a process took a lot of time, because when installing wiring, more than a dozen sockets and switches are installed, not to mention the installation of an electrical panel, where the machines are mounted and zero tire. Therefore, today the NSWI is an ideal solution to such problems. If you select the caps on the cross section of the core, the installation and installation of the conductor to the electrical equipment will take several minutes. The connection will look like this:

It should be remembered that the dimensions of the ratio of the cross-section of the sleeves and the cable are provided by the manufacturer, and they must be strictly observed. This will avoid problems with damage to the cable and the connection will work reliably throughout the life of the cable. It is also necessary to have a good tool that will greatly facilitate the installation process, and with which you can qualitatively compress the tips. Careful adherence to technological standards will contribute to reliability and quality.
Now you know what the NShVI tips are for, what types and sizes of these devices are and what is equally important - how are they correctly crimped.We hope that the prepared material was useful and understandable for you!
Surely you do not know:


The article is good, only I’ll say this:
Personally, when I did the wiring in my private house, I was also puzzled by the problem of wire harnessing. And instead of crimping them into tubes, he simply applied the most usual tinning with solder.
I agree, a little more trouble with a soldering iron, but firstly, the result is not only worse, but even better, and secondly, it’s unprofitable to buy a crimp for crimping even 100-150 ends (I got 77 terminations). And every normal master has a soldering iron.
The soldered ends will need to be pressed in the machine. The solder has a flow property = contact will weaken = spark. According to the rules, it is forbidden to solder a stranded wire under the terminal.
Alexander,
Do I understand correctly that for NShVI (2) 6mm2 do I need to use 6mm2 wires too?
or should we take into account the fact that two wires of 6 mm2 will already be 12 mm2, and we need to look for another NShVI (2)?
or is it already stipulated for in the NShVI (2) and the NShVI (3) and their marking corresponds to the combined wires?
Alexander, the answer to your question is contained in this article in the first video: for NShVI (2) 6mm2, wires also need 6mm2.
Rave. . For example, Two wires 2.5 will not fit into the tip of a nshvi (2) 2.5. For them you need nshvi (2) 4.0
do not write nonsense, check do not be lazy. nshvi-2 go to that section of two wires as indicated
the table says that nshvi 2.5 has an internal diameter of 2.3 mm, using the formula s = pi * r ^ 2 we get that the area is 4.15 mm ^ 2 ... and how to fit 2 wires with a diameter of 2.5 mm ^ 2 into this area? ??
Here is an example.