4 easy ways to make a soldering iron from improvised materials
Sometimes there are situations when the owner simply can not do without a simple soldering iron. For example, you need tin stranded cable for the outlet, or unsolder part from a burned device. At such moments, you have to either borrow the tool, or put off the matter indefinitely. After all, not everyone will want to buy an expensive soldering iron or soldering station if it is not a repairman. However, there is a simple way out of this situation - to assemble a small soldering iron yourself, it is just suitable for small work. The manufacturing process does not take much time and effort, but you can save a certain amount of money and get invaluable experience. Next, we will tell you how to make a soldering iron with your own hands at home. You will be offered several designs, and you can choose the one that suits you the most.
Idea # 1 - Using a Resistor
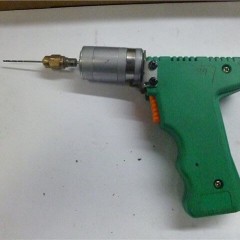
The first and most simple technology for making an electric soldering iron with your own hands - using a powerful resistor. The device will be designed to operate at voltages from 6 to 24 volts, which will allow it to be powered from various current sources, and even make a portable version, powered by a car battery. In order to make the instrument yourself, you will need the following materials:
- Soviet wire resistor (SEW), coated with ceramic insulation with a resistance of 20 ohms and a power of 7 watts. You can choose components with other characteristics, depending on what power you want to make a soldering iron on and what voltage it is planned to be powered from. Here is the simplest formula for calculating: R = U² / P. Where R is the resistance measured in Ohms; U - voltage, which is planned to power the soldering iron, in Volts; P is the desired heater power in watts. This item can be bought on the market or in the radio parts store, as well as pulled out of the old Soviet device.

- Textolite or plywood plate for making a comfortable pen. You can use other non-conductive materials that can withstand high temperatures, for example, some types of plastic.

- Two copper rods of various sections. The one that is thicker is selected strictly according to the inner diameter of the resistor. The quality of heat transfer from the heating element to the sting will depend on this, and therefore the heating time, the convenience of operation. The second should be thinner, it will act as a sting. With the help of a file it will need to be sharpened to a shape convenient for you. The main types of stings are shown in the picture. Immediately I would like to note that the most convenient option is the type of a flat screwdriver, since it is convenient to transfer solder to the place of work on it, and it is possible to solder massive contacts and perform delicate work.

- One bitten spring ring (will serve as a retainer), a screw and a washer. You can see all the accessories in the photo below.


To make a soldering iron from a resistor at home, you must perform the following steps:
- At the end of a thick copper rod, you need to drill a hole and drive the thread under the screw with a tap. It is also necessary to cut the groove under the retainer, which in our case is the spring ring. This can be done using a triangular file or a hacksaw for metal.

- From the second end, drill a hole with a diameter, like a thin rod, which will act as a mini soldering iron tip.
- All the elements of the rod must be assembled into one, as shown in the photo.

- The resistor is prepared for fastening the soldering iron tip, which must be inserted and fixed at the back with a screw and washer.

- From a textolite or plywood plate, you need to make a convenient handle with your own hands with a seat for a resistor and a wire. To do this, use a jigsaw to cut out two identical halves of the handle and make holes and recesses for screws and nuts.

- Connect the power cord to the heater leads. It must be screwed so that the contact is reliable.

- Ready-made homemade soldering iron is twisted and checked.

We draw your attention to the fact that such a portable gun can easily solder microcircuits and even make charger for car battery do it yourself. It can work not only from the power supply, but also from the battery. On the forums we met a lot of reviews, where this version of homemade was connected from a cigarette lighter to 12 Volts, it is also very convenient!
Please note that when you first turn on all soldering irons can smoke and stink for some time. This is normal for any model, as some elements of the paintwork burn out. Subsequently, this will stop.
Idea # 2 - Second Life Ballpoint Pen
There is another unusual, but at the same time simple idea of how to make a soldering iron with your own hands from improvised materials for soldering small parts or smd components. In this case, we again come in handy. resistor, but now it’s not PEV (as in the previous version), but MLT, with a power of 0.5 to 2 watts.

So, first you need to prepare the following materials:
- Ballpoint pen of simple design.
- Resistor with characteristics: resistance 10 Ohm, power 0.5 W.
- Bilateral textolite.
- Copper wire with a diameter of 1 mm, it can be wound from an old inductor or bought a single-core copper wire in insulation at an electrician’s store and carefully removed with a stationery knife
- Steel or copper wire with a diameter of not more than 0.8 mm.
- Wires to connect to the network.
Making a soldering iron from a pen at home is quite simple, you just need to follow these steps:
- Remove paint from resistor surface. This operation can be carried out with the help of a sandpaper, file or file, in extreme cases, a knife. The main thing is not to overdo it, so as not to damage the resistor. If the paint does not remove well, connect the product to an adjustable power source and heat a little.
- 2 wires come out of the barrel, cut one of them and drill a hole for copper wire (diameter 1 mm) in this place. To prevent the wire from touching the cup (this must be avoided), make the countersink a thicker drill, as shown in the photo below. In addition, you need to make a small cut for the wire directly on the cup of the resistor. The triangular file is here to help you again.

- Bend the steel wire in the shape of a handle with a ring mount, with a diameter similar to that of a cup. If you have copper wire, then you need to hold the cup in it and make a twist using pliers so that the contact is reliable, but do not overdo it, otherwise you will remember the case. Remember that the wire should be without varnish insulation.

- Carefully cut the circuit board out of a double-sided PCB, exactly the same as shown in the example in the photo. It is not necessary to buy a new PCB sheet. You can use a jigsaw to cut a suitable piece from any unnecessary double-sided board. Or do without it at all: twist the wire with wires, and attach them to the handle using superglue. The main thing you need to pay attention to is the distance between the heating element and the handle is more than 5 cm, otherwise the plastic may melt.

- Next, you need to assemble a homemade soldering iron from a pen, which should not cause difficulties.

- It remains to install a thin sting in the seat. So that the copper wire does not burn through the resistor, you need to make a protective layer of a piece of mica or ceramic between the back wall and the sting.

- The last thing to do is to connect the homemade product to a 1 A power supply and a voltage of not more than 15 Volts using wires.

That's the whole technology of creating a homemade mini soldering iron at home. As you can see, there is nothing complicated in the manufacture of this tool, and you can easily cope with it, and all the materials can be found at home by disassembling old equipment or looking for them in the bins.
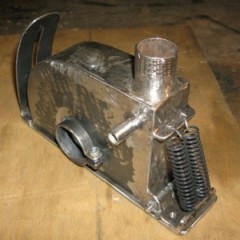
Idea # 3 - Powerful Impulse Model
This option is suitable for those who are already more or less familiar with radio engineering and can read the corresponding schemes. A master class on the manufacture of a homemade pulse soldering iron will be provided according to the example of this scheme:
The advantage of this tool is that the sting heats up already 5 seconds after turning on the power, while the tin can be easily melted with a heated rod. At the same time, it can be made from a switching power supply from a fluorescent lamp, having slightly improved the board at home.
As in the previous examples, we first consider the materials from which you can make a soldering iron with your own hands at home. Before assembly, you must prepare the following tools at hand:
- Ferrite ring from a pulse converter. The primary winding of the transformer should consist of 100, a maximum of 120 turns of copper wire, with a diameter of 0.5 mm. The secondary winding is represented by one turn of a copper bus, with a diameter of not more than 3.5 mm.

- Copper wire with a diameter of 1.5 to 2 mm as a sting.

All you need is to connect the sting to the secondary winding, which, in fact, is already part of it. After that, one of the conclusions of the ballast must be connected to the primary winding of the transformer and fasten all the elements of the circuit in a reliable case, which will protect you from accidental electric shock, since the circuit contains a life-threatening voltage of 220 volts!
The principle of operation of this design is that the ballast from the lamp creates an alternating voltage, which is supplied to the primary winding of the transformer and lowered to low values, while the current rises many times. One turn, which is, in fact, a soldering iron tip acts as a resistor, on which heat is dissipated. When a button is pressed, current is supplied to the circuit, and fast heating occurs, after the button is released, the sting cools quickly, which is very convenient, since you do not need to wait a long time for the tool to heat up and cool down.


Idea # 4 - A Simple Wire Option
There is another option for making a miniature soldering iron - using nichrome wire. For this you will need:
- A piece of nichrome wire. You can pull it out of old heating elements, wire resistors, irons, hair dryers, etc. The main characteristic of such a wire is its diameter, because the coil resistance and, accordingly, the power of the tool being manufactured depend on it. You can calculate the required length for your diameter according to the formula specified in the instructions for option No. 1.The specific resistance of nichrome depending on the diameter is shown in the table below.


- A piece of wood of circular cross section.

- A piece of copper wire with a diameter of 1.5-5 mm, 15 cm long.
- A small piece of fiberglass insulation for wires.

- A little gypsum. Sold in construction stores, another name is alabaster. Many still have a little after repair.

- Wires.


Manufacturing process:
- Drill a hole in the bar under the copper wire 3 times more than its diameter.
- Put a piece of copper wire in it so that it protrudes about 5 cm and fix it there with a thick putty made of gypsum, let it dry.
- Put insulation on the copper rod, which is a sting, and wind the required amount of nichrome wire, leaving the distance between the turns. Also put insulation on the ends and bring them closer to the handle. Then connect to twist with wires. Tape them to the handle on the electrical tape.

That's all, you got one more simple and reliable do-it-yourself soldering iron design.
Nevertheless, we recommend using either the first or second option, which is more understandable and simple to manufacture. As for the transformer version, although it is more powerful, it is still not so convenient to use. We hope that these photo instructions were useful for you, and in the end we recommend that you definitely see all the video examples in which the assembly process is discussed in more detail!
Also read:


Is it obligatory to use textolite? How can it be replaced? What purpose does he fulfill in a soldering iron? Thanks in advance!
Hello! Textolite was simply used by the author. The pen can be made from any other material at hand. He does not give any special properties to a homemade soldering iron!
it is heat-resistant, heats poorly, and does not transmit electricity, everything is simple
Textolite acts as a printed circuit board (they are made of it). And it just transfers electricity (only if copper-plated. In this case, it is copper-plated)
in the second example, the 10th resistor must be drilled, or can it be replaced with an SMD resistor and how can you come up with a mount?
Theoretically possible. Try it and tell me what happened)
Hello! Please tell us in more detail about the home-made circuit board, and pictures of its manufacture, if possible. (Example No. 2 soldering iron from a pen)
I just started making a soldering iron from a copper tube of a soldering iron tip and a stylus from a simple pencil.
Error in the third example, the diode bridge needs to be changed
Or change another transistor npn to pnp