Cable heating of water pipes
How does the heating system work?
To begin, consider how the heating of pipes by electricity occurs. The heating principle is built similar to the system heated floor electric – self-regulating or resistance heating cable laid in the right place, connected to the network, resulting in heating of the area. There are two ways to install a heating conductor for water supply - fastening from the inside or from the outside. Each option has its advantages and disadvantages, which we will discuss below.

As for the heating cable, the resistive is used more often, because It costs an order of magnitude cheaper. An important nuance is that a two-wire conductor is used to heat water pipes. This is due to the fact that the single core must be looped, and this is very problematic in the conditions of installation of cable heating for the water supply. An alternative is the laying of a self-regulating conductor, which heats the pipes more economically and can work without a thermostat. The disadvantage of using a self-regulating model is the higher cost (about 2 times).
Conductor Mounting Methods
First, we will consider how to install the heating cable for the water supply system internally and externally, after which we will talk about the nuances of connecting and additional thermal insulation of the system.
Down the pipe
At the stage of laying the water supply circuit, it is more preferable to fasten the heating cable through the pipe. This can be done in two ways - along the pipeline or around. Consider the mounting instructions for each of the methods.
Along the pipeline
The easiest way is to install the heating cable in one line along the contour. In this case, the conductor must be attached under the pipe, which protects the heating element from mechanical damage from above. In addition, the water begins to freeze from below, so the lower location of the flexible heater will allow you to quickly eliminate freezing of the water supply.
If you decide to lay several cable lines along the pipe, you need to do this as shown in the diagrams below:


As for fixing the heating cable to water pipes, it is best to use aluminum tape, which reliably fixes the conductor and increases its heat transfer. Instead of adhesive tape, you can also use adhesive tape for fastening, which wraps the pipeline in the following way:
Pay particular attention to installing the heating cable for the water supply through the corners. So that the bend is not too large, it is recommended to place the conductor along the outer radius of the pipe, as shown in the picture below:

Spiral
In regions with very low temperatures, it is recommended to completely wrap the heating element around the pipeline. In this case, the heating efficiency will be an order of magnitude higher, because the pitch of the turn is about 5 cm (you can increase it at will). The length of the conductor when winding with a spiral should be about 1.7 times the length of the water supply. Cable laying with a spiral in hard-to-reach places can be done as follows:

In this case, the heating cable is first wrapped with an allowance, after which the loops are wrapped in the opposite direction. As a result, the action is less than with a stepwise winding of the water supply.
Individual nodes
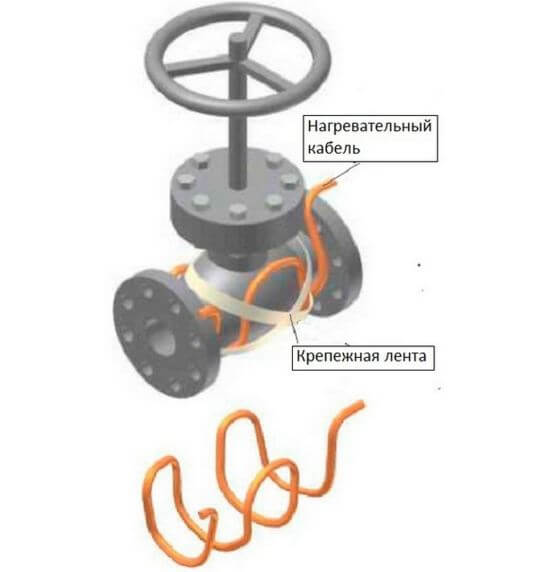
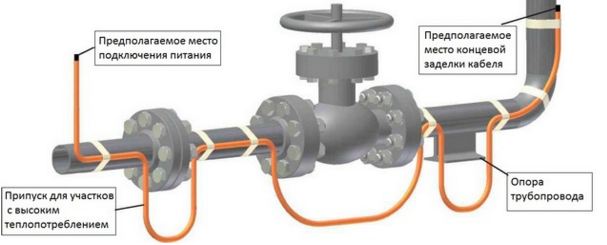
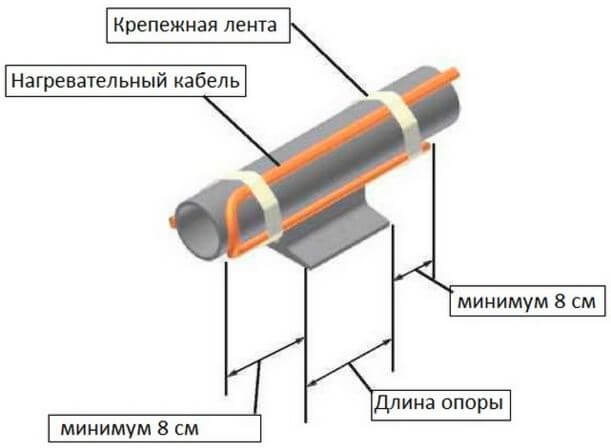
On nodes such as metal supports, taps, gate valves and flanges, you need to fix more flexible heater, because there is a greater heat dissipation. You can clearly see the installation diagrams below:

We also recommend watching in the video how the heating cable is laid through pipes:
Special attention should be paid to the installation of a temperature sensor. In order for the water supply heating to work properly and the cable not to overheat, it is recommended to place the sensor in the coldest point, as far as possible from the cable line. The installation location of the temperature sensor is recommended to be pre-glued with a strip of aluminum tape. Examples of proper sensor placement are provided below:

From the inside
Installation of the heating cable in the pipe is recommended if it is not possible to conduct heating from the outside. Most often, this method is chosen if the water supply is already installed underground, in concrete structures and other inaccessible places. The disadvantage of installing a flexible heater inside is as follows:
- The pipe clearance is reduced (inner diameter for water supply).
- Over time, the conductor begins to overgrow with plaque, resulting in blockages.
- A new point in the water supply is added - a tee, which reduces the reliability of the circuit.
- Installation of the heating cable is allowed to be carried out only on rectilinear and slightly curved sections of the water supply. It is forbidden to conduct a flexible heater through tees and stop valves.

At the same time, the low energy consumption of the heating system (direct contact of the heater with water), as well as less laborious repairs (just pull the cable out of the tee, you do not need to break the ground, etc.) are considered positive aspects.
So, the installation of the conductor inside the pipe is carried out according to the following step-by-step instructions:
- The first thing to do on the cable is to put on an stuffing box for placement in the pipe. This node looks like shown in the photo above.
- A tee is mounted in the right place of the water supply, through which it will enter a flexible electric heater.
- The cable is carefully laid to the problematic area that will need to be heated.
- The stuffing box is twisted, sealed and crimped.
As you can see, the internal installation of the heating cable in the water supply is not difficult. Now let's talk about the final stages of installation: connection to the network and pipe insulation.
Network connection
Since you are only learning how to make electric heating of water pipes, at the stage of fastening we did not talk about one very important nuance that we will dwell on now - insulation of the end of the conductor. For this, a heat shrink tube is used, which reliably protects the cores from moisture.Also, to connect a flexible heater, you need to connect the heating part with the so-called "cold". We recommend that you visually see all the stages of the connection on the video:
For economical and safe operation of the water heating system, we also recommend connecting two devices: RCD and thermostat. The first device will protect the heating system from current leakage, and the second will allow you to adjust the heating temperature through the temperature sensor. An important nuance - when connecting the sensor to the thermostat, it must be borne in mind that most models work properly only if the length of the water supply does not exceed 50 meters (it is better to check it already at the place in the store).
Thermal insulation
Well, the last thing to do is to insulate the pipes for better heat retention. As a heater you can use special cylinders cut on one side. They can be made of mineral wool, foamed polyurethane or even expanded polystyrene. Choose the appropriate option for the price and wrap the pipes with it. In addition to heat conservation, the thermal insulation layer additionally protects the conductor from mechanical damage (for outdoor installation). The thickness of the insulation must be at least 20 mm for half-inch pipes, 30 mm for inch, 50 mm for two-inch and 65 mm for other sizes.
It will be interesting to read:
Mounting the tip and connecting the two sections


Is it possible to adjust the temperature regulator from TEPLEKO ceramic plates to regulate the heating temperature of a self-regulating heating cable (intended for heating the water pipe from the inside)? I read on one of the sites that when the temperature of heating the liquid reaches 15 degrees, such cables automatically turn off the power. I enclose a photo of a cable and a temperature regulator.
Thank you for the article. Installed a heating cable https://www.youtube.com/watch?v=bJ5ALwRyupM bought from China https://www.youtube.com/watch?v=6xuwHV2i6mw
Tell me what is the maximum permissible length of the heating cable per connection. those. what's the difference if the cable length is more than 150 meters or up to 50 meters the connection is made to 1 thermostat, in areas with especially cold climates, will there be a decrease in efficiency (cable heat transfer) or not ????. or there’s no difference.
It all depends on the type of cable. You should clarify this before purchasing a heating cable from a consultant - the maximum connection length of one cable should be indicated so that there is no voltage drop, which will lead to a decrease in power with an increase in length. If it is not recommended by the manufacturer to connect one piece of 150 m, then connect two 75 m each.
Or a different length, based on the maximum allowable for a given cable.
Is it possible to make heating not from the network but from the car battery? It is necessary to conduct water in the bathhouse in the country, but I would like to disconnect everything during the absence during the winter. And to prevent the pipes from freezing, use a battery.
The battery will not last long.
If you use a battery, you will have to use an inverter that converts a constant of 12 volts to a change of 220 volts.
Inverter required. Moreover, if you still put a car charger and connect to the inverter along with a heating cable, the battery will begin to recharge and will not sit down. The law of conservation of energy is called.
Hello! Please tell me, is it just connected directly to the household electrical network or is some kind of adapter needed? Can I plug into a power outlet at home?
Hello! It depends on which cable, if resistive, then a piece of cable of a strictly defined length is connected to the network, i.e. such a cable should not be cut. If self-regulating, then it is also possible to connect. At the beginning of the article there are links to notes on these types of cables, check out.
Hello Alexander, I have such a problem in my borehole I have to install an internal cable heater for two years yesterday it became cold I turned it on, the socket and plug melted and water drips through a spiral onto the plug. Can I fix it or change the plug?
why did they melt? I think that you need to change the cable, most likely it is damaged.