How to make wiring in the garage?
The technology for installing electrical wiring in a garage is at least different from the wiring in an apartment or house, but not significantly. The differences are mainly in the features of your particular garage. If you have a building in the yard, you need to lay power to it, and if in a garage society or a cooperative, then most likely you will have to connect to the line laid on the supports. To do this, be sure to contact the electrician who services this society. The cost of installing electricity made by a specialist can hit your pocket noticeably, but in most cases you can lay or replace the wiring yourself. In this article you will learn how do-it-yourself wiring in a garage can be done.
If you have little experience, then carefully follow the advice described in the article, and after completing the work, consult a specialist and ask him to check the installation.
Schema creation
Before you move on to preparing the walls, you must carefully draw up a wiring diagram in the garage. The diagram must indicate the place where the power cable is inserted inside, the place to install the electrical panel, as well as the place to install bulbs, lamps and sockets.
A garage is a fire hazardous place; motorists always store fuels and lubricants in them, and the car itself. By the way, to determine the fire hazard class of a garage, you can use the items PUE from 7.3.38 to 7.3.53., as well as SP 12.13130.2009, since R 3107938-0301-89 is already outdated. When drawing up the scheme, you need to remember:
- The wiring must be strictly vertical and horizontal along the walls. Turning is carried out only at right angles.
- If the garage has heating, even central, even a stove, then the wire must be laid at a distance of at least 10 cm from the heating pipes with parallel installation, according to PUE 2.1.57. Moreover, when laying closer to the pipeline closer than 25 cm, the cable must be additionally protected from damage, that is, laid in the pipe, for example.
- The switch is recommended to be mounted at a distance of 10-15 cm from the door jamb, at a height of 1.5 meters from the ground.
- Outlet Installation carried out at a height of 60 cm from the floor.
- Unlike an apartment in a garage, there is no need to place outlets in every corner. Install a group of outlets near the workplace, near each of the machines, if any, as well as an outlet in the electrical panel.
- The frequent location of sockets is dangerous because you can damage sockets with switches, and wiring to them when performing some work in the garage, and when carrying heavy objects, demolish an electric point.
- In many cases, it is better to get an extension cord on the drum and unwind it to the place where the work will be carried out.
- Do not install 220V sockets in the inspection pit.Water may accumulate in the pit; for electrical safety purposes, 220V luminaires must not be installed.
- In a pit, it is better to use 12V lamps (in stationary lamps), use portable lamps or place a 12V socket to connect them, for details see PUE 6.1.16, 17.
- Separately for lighting and sockets recommended install circuit breakers and RCD. If you suddenly have to repair the outlet, you can do this with the light on.
- Install a step-down transformer 220/12 to illuminate the inspection pit and carryings in the electrical panel.
- If possible, be sure to make a three-phase input in the garage. It will be needed when connecting three-phase asynchronous motors, namely they are installed in most machines, both home-made and branded. You do not have to buy capacitors (an expensive pleasure), or get out of the situation by looking for single-phase, for example, collector motors. Also, this will allow you to connect a load of greater power, with the same current input machine.
 Scheme of a three-phase electrical panel for connecting single-phase and three-phase equipment:

General wiring diagram in the garage:

The last installation option we examined in more detail in the article: garage wiring diagram!
It should be noted that it is best to use a construction plan (if any) to create the scheme. In this document, the drawing is followed with all exact dimensions, which will be convenient for creating the right project.
Calculation of the amount of materials
After creating the scheme, you must proceed to the next step - counting the quantity materials for wiring. First, read the amount of cable. Note that the electrical wiring in the garage will be both internal and external (for laying from the pillar to the meter and input), so you will need to purchase materials for all types of work. From the pillar usually lay SIP wire, its cross-section will be indicated to you in the technical conditions for connection, while according to PUE 7.1.34 and table 2.4.2 “The smallest cross-section or diameter of the branch wires from the overhead lines to the inputs”, the cross-section of aluminum conductors is allowed to be used no less than 16 square meters. mm, or more than 2.5 square meters. mm, if this is the power of a separate electrical equipment (the garage is not such).
Based on the above (PUE 7.1.34), the wiring inside the garage must be made with a copper wire or cable. For wiring inside the garage, use VVGNG-LS.
To correctly calculate cable cross-section it is necessary to determine exactly which electrical appliances will be installed indoors. The total power of all electrical appliances must be multiplied by a factor of “1.2” (power reserve of 20%), based on which, according to the table, select the appropriate value. Route the cable to the sockets with a cross-section of conductive wires of 2.5 square meters. mm, to individual devices - calculate by power.
As for the length, we must take it with a margin, because the conductor will be cut into parts (from the outlet to the shield, from the switch to the lamp, etc.). For each wire connection it is necessary to take a stock of 10-15 cm.
Calculate the exact number of outlets in the garage. There should be at least 2x. One for the extension cord (in case of machine repair), and the second for a stationary electrical appliance (for example, a compressor or a welding machine). There will be two switches: one for the inspection hole, the second for the main lighting. If necessary, you can add more switches to control the light on each wall, for example.
Special attention must be paid to fixtures. Nowadays, LED and fluorescent lamps are popular. The first option is more economical and durable, but at the same time more expensive.
It will be excellent if the lamp itself has a high dust and moisture protection class - IP54 and higher. This is especially important if the garage is unheated and condensation can accumulate.
If will be carried out installation of open wiring in the garage, you must also calculate the number of fixtures, corrugations or cable channels. According to SNiP 3.05.06-85 (table 2), the step of fastening open wiring in pipes with a diameter of 20 mm is not more than 1 m, 32 mm is not more than 1.4 meters. Such requirements can be applied to cable laying in corrugation. At the same time, there are requirements for fixing the cable without pipes and corrugations with open wiring; they are described in VSN 180-84. Clause 7.2., where it is said: "The distance between the points of attachment of wires and cables should be at least 500 mm for horizontal laying and 1000 mm for vertical". In this case, you need to take into account the requirements, but in fact you need to fix the corrugation every 0.3-0.7 meters, so that it does not sag.
Hidden installation of wiring we do not recommend using, as it is more time-consuming and is unlikely to improve the interior of the room. After all the elements are calculated, we proceed to the main process.
Main process
Installation of wiring in the garage consists of three main stages:
- training;
- street laying;
- internal cable routing.
We will consider in detail each of the stages in the form of step-by-step instructions so that you know how to conduct electrical wiring in the garage with your own hands.
Preparatory work
Preparatory work consists in cutting the cable and preparing the walls. Cutting is carried out taking into account the margin of length (as we have already said, at least 10 cm per connection). Further walls are marked according to the created scheme. For marking, you can use a marking cord. Cord marking is the simplest and most effective. It is necessary to fix the cord at the starting point (as shown in the photo below), and then stretch it until the next branch or end point of the wiring. Next, the cord is pulled along the wall, pulled aside and sharply released. As a result, a painted imprint should remain on the wall, which will be the markup. The main task is to pull the cord strictly vertically (or horizontally) so that the trace matches the marks on the diagram. For this you can use a plumb line and a building level. There is also an option do laser level do it yourself, which will help to mark the walls for wiring in the garage.

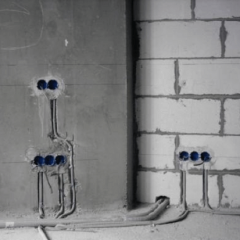
After marking the walls, it is necessary to prepare the strobes for wiring (with the internal method of installation).

Usually this option is used when installing electrical wiring in a concrete garage. It should be noted that the line can also be run along the technological opening between the floor slabs, but this option does not always exist.
For wall chipping It is recommended to use a grinder with a disk for concrete or a puncher. If this tool is not at hand, a chisel and hammer will help you. The depth of the strobes should be no more than 2 cm, the thickness is selected in accordance with the cross-section of the core, but also no more than 2 cm. When the entire route is represented by strobes, you can proceed further.
We draw your attention to the fact that in a brick garage you can hide the wiring in the seams between the rows (as shown in the photo), so as not to create strobe!

Also in the process of preparatory work is necessary make ground.
Street work
The laying of external electrical wiring must be passed into the hands of a specialist electrician. First, select the method of external cable laying. It is recommended to use the air method, as It is less expensive and time consuming. If the distance from the street post to the garage is more than 25 meters, according to the EMP 2.4.12. take care of creating an intermediate support in the yard.

There are some requirements for air wiring of electrical wiring:
- height above the carriageway - at least 6 meters;
- height above the pedestrian zone - at least 3.75 meters;
- the height of entry into the room is not less than 2.75 meters.
The last requirement can create some problems, becausethe garage is a low building, and when a cable is inserted through the roof, many problems can arise (the complexity of waterproofing the room, the high risk of mechanical damage, etc.).
In this case, it is recommended to install nearpipe rack - a steel pipe slightly bent at the top (as shown in the picture).

With underground wiring to the garage, such difficulties do not arise. It is only necessary to dig a trench (from the central power line to the distribution panel) and place an armored copper cable in it, for example VBBSHV. The main thing is to leave the inlet for entry inward in the foundation in advance. To protect the cable from mechanical damage, it is recommended to place it in a special steel box, on top of which an additional rubber tape with the inscription "Do not dig, below the cable" is laid. Under the foundation, the line must be protected by a pipe whose diameter is two times the cross section of the core. Outside, the pipe should exit no more than 5 cm.

The disadvantage of underground wiring in the garage: the high cost of armored cable, as well as the complexity of the work. Despite the costs, this method is more durable.
Indoor installation
Indoor installation of garage wiring is not difficult. Consider the wiring of the hidden and open type.
Hidden way
When wiring in a hidden way, it is necessary to place the cable in the strobes and fix it. For fastening, special plastic clamps or metal brackets are used.
It is recommended to use grandfather cable mounting method using alabaster. The solution grabs the track every 25-30 cm.

After that it is necessary install junction boxes, as well as connect sockets and switches. Further, all the cores are connected, and the wiring of the wiring in the garage is carried out with a multimeter. We draw your attention to the fact that the connection should be carried out by crimping with sleeves, welding, soldering or terminal blocks. If there are no problems and the wiring is laid out according to the rules, it is necessary to plaster the walls and wait until they dry.
We strongly recommend that you photograph the wiring before wall decoration. This will allow you to quickly find the locations of the faulty network section (although it’s better to use homemade metal detector).
Outdoor way
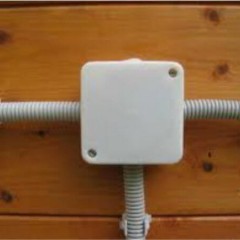
If you decide to conduct electrical wiring in a wooden or iron garage, then the line must be run in an open way. This is much simpler and more convenient, because if you need to connect a new outlet, you do not need to hammer the wall from the installation box to the new "point".

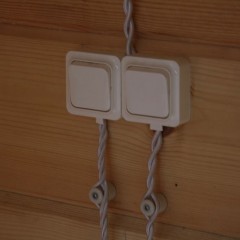
Open wiring usually lasts in special cable channels. They do not spoil the appearance of the room and are safe (if the material for manufacturing the channels is self-extinguishing). You can also use the mount on insulated supports, but in this case, the aesthetic appearance of the room will suffer a little, and security will decrease.
If you have a wooden garage or SIP panels, or you are going to sheathe walls with other combustible material, you must use the rules for laying electrical wiring on combustible coatings, you can find them inChapter 2.1 of the EMP (paragraphs 2.1.31-2.1.51), table 2.1.3 and chapter 7.
It says that when laying on combustible coatings, open wiring must be placed in pipes. Can be laid in steel and copper pipes. It is necessary to use cables with non-combustible insulation, in practice, products with a prefix in the marking FR, -ng-LS are used. You can also perform installation in gray PVC corrugation that does not support combustion. The distance between the wire and the surface to be burned must be at least 10 mm. When laying the cable in a sheath of combustible materials (without prefixes –ng-LS, etc.) without a pipe, it is also necessary to lay a non-combustible (metal, for example) strip.
That's the whole technology of installing electrical wiring in the garage with your own hands. Do not forget to call an electrician at the end of work so that he checks everything.

How, you see, the process of installing wiring in the garage is time-consuming, but it does not represent anything supernatural, so it can be possible even for you, a novice electrician! You can also familiarize yourself with video clips in which all types of work are presented more clearly:
This is how the wiring in the garage can be done. We hope that the step-by-step instructions provided by us, the diagram and tips helped to carry out the electrical installation.
Related materials: