How to repair the light switch yourself?
If at one fine moment you notice that the light switch in the room does not work or turns off the lighting every other time, you should not immediately go and buy a new one. The design of the product is not complicated and most often the cause of failure is the burning of contacts, which you just need to clean. Next, we will consider in detail how to fix the light switch with your own hands, and also tell you why this type of breakdown can occur.
Repair Technology
So, so that the repair instructions are understandable for you, we will consider it in stages, with photo examples for each important moment of repair.
- First you need to prepare the tool: marker, fine-grained skin, indicator and ordinary screwdriver.
- Turn off the machine on the input shield to turn off the power to the house and protect yourself from electric shock.

- Make sure that there is no voltage in the room by independently checking the availability of power in an adjacent outlet using an indicator. If you do not know how to use an indicator screwdriver, we recommend that you read the instructions to which we referred.

- Remove the light switch from the strobes. Before you repair the product, you yourself need to remove the decorative cover, once again check the absence of voltage with an indicator screwdriver, unscrew the side screws and pull the case out of the socket.

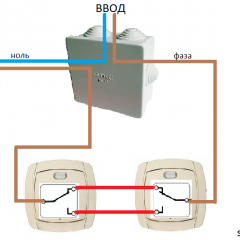
- Disconnect the wires. If the light switch is two-key, we recommend marking with a marker which of the cores is the input, so as not to confuse and correctly make the connection on your own.
- Disassemble the case and get to the contacts, which are most likely the cause of the repair. These structural elements are immediately behind the plastic key, which is fastened with screws. Repairing them will not be difficult, as you will see later.

- Visually look at the contacts in the form of a hemisphere (you can see them in the photo) and if they are burnt, use a fine-grained skin to smooth them to a metallic luster. If it is not possible to clean the soot well with a sandpaper, you can carefully clean the tip with a screwdriver. This is enough to fix the light switch with your own hands.

- Reassemble the housing in the reverse order. The video below shows how the light switch is disassembled and assembled at home.
- Connect the wires, as well as install the housing in the socket.
- Turn on the machine on the panel and check if the light switch is working. If the switch does not crack and works correctly, you can be proud - you managed to fix the product. If the light is on when the switch is turned off, it means that you have poorly cleaned the contacts or incorrectly completed the connection, so you will have to do it all over again.
Video housing assembly instructions
Thus, in 10 steps, you can fix the product with your own hands. As you can see, the repair is not complicated and even an electrician-novice can do it.We also recommend that you familiarize yourself with the tips below that allow you to quickly and correctly repair a circuit breaker in your apartment.
Practical tips
- If the circuit breaker of the old model is broken, you can of course fix it, but this makes no sense, because every part wears out over time, and it is very dangerous to operate old switches and sockets in an electrician, especially if they often fail. Today, even leading companies such as Legrand have inexpensive, but reliable products even with backlight, chain (cord) or dimmer.
- The reason why the contacts on the key switch quickly burn out is that the bulbs are too powerful. We recommend replacing incandescent lamps with more efficient and at the same time less powerful light sources - LED lamp. In this case, you can forget about repairing the circuit breaker for a long time.
- Before proceeding to complete disassembly of the housing, check how well the cores are tightened with screws. You may be able to repair the switch simply by tightening the screws with a screwdriver.
- In order not to confuse the order of assembly of the parts of the disassembled case, we recommend using a camera: take photographs of each of the stages of disassembly in turn and, if necessary, assemble the structure from the photo.
That's all I wanted to tell you about how to fix the light switch with your own hands. We hope that the provided instructions and photo examples will help you repair the switch that does not turn off or does not turn on the lighting in the house!
Also read:
Video housing assembly instructions


I really liked your article, took a couple of points from it to my note. I managed to fix the outlet myself.
Thank.